Microsoft Power Automate is a process automation platform which makes automating repetitive tasks with little or no code..
If you have a Microsoft 365 subscription you probably already have access to Power Automate. Check your subscription or talk to your Microsoft partner for more details.
You may be able to automate processes such as picking up when addresses are added to a an Excel spreadsheet and then sending a PDF letter to that address that sits in SharePoint or in OneDrive.
You can send your letters to PC2Paper using Power Automate and our RESTFul JSON API by following these steps below.
In the example below we’ve setup a new Flow in Power Automate with a Manual Trigger. We are getting a PDF file to use, using the OneDrive for Business Action. You can use any action you’d like to provide a file for upload.
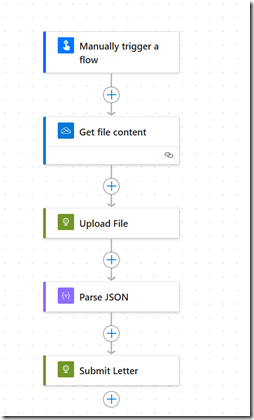
Add the Manual Trigger flow (you can use a different one here depending on the process you are after) and the OneDrive for Business Get File Content Action below it. If there is another Action you’d prefer to use you can use that instead.
Uploading a PDF
We have used the HTTP Action to upload our PDF file add this below the One Drive for Business Get File Content Action. You can search for it as HTTP in the action search box, you will want the plain HTTP adaptor.
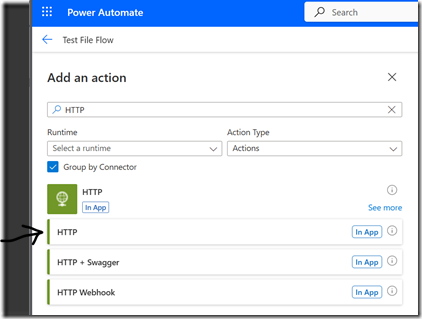
Once added you can rename this adaptor to “Upload File”
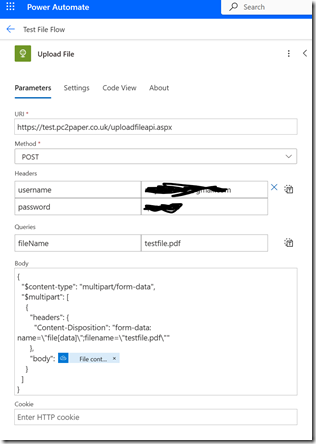
Enter the following details
-
-
Method: Set this to POST
-
Headers: Add the following headers and place your PC2Paper username and password (or API keys) into them
-
Queries: Over here you will want to enter “fileName” and in the value field give your file a name. You can enter anything in here and you can populate this from a previous action if you have one.
-
Body: For the body you will want to enter the following JSON
{
"$content-type": "multipart/form-data",
"$multipart": [
{
"headers": {
"Content-Disposition": "form-data: name=\"file[data]\";filename=\"testfile.pdf\""
},
"body": @{body('Get_file_content')}
}
]
}
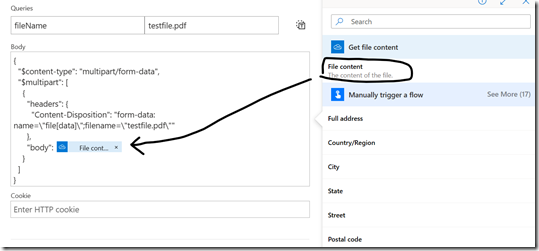
Where you see this tag @{body('Get_file_content')} you will want to drag in the content from the OneDrive Action that ran before this action. You select this from the little lightening bolt that appears next to the Body text box when you click in it.
Parse the results from the PDF Upload
After you have completed the previous step you will want to add a “Parse JSON” action. We will use this to parse the JSON returned by the upload file action.
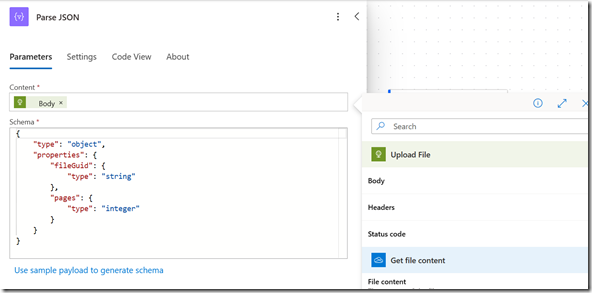
Schema: Enter the following text into the schema box.
{
"type": "object",
"properties": {
"fileGuid": {
"type": "string"
},
"pages": {
"type": "integer"
}
}
}
Content: Select the content box and then select the lightening bolt that appears next to it and select (as per the image above) the Body field from the Upload File step you did previously.
Submit Letter
Now for the final Action
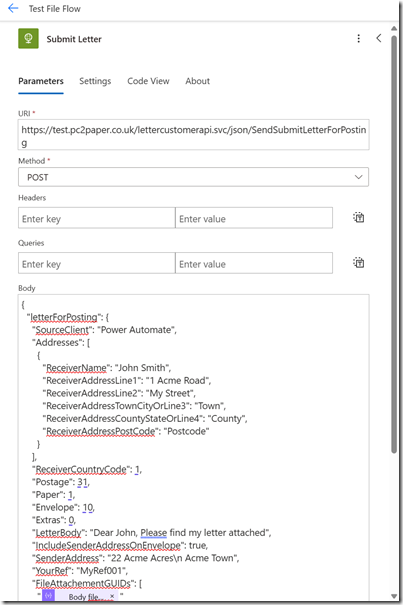
Add another HTTP Action after the “Parse JSON” Action.
Enter the following details
-
-
Method: Select POST
-
Body: This is the same JSON example used in our JSON API example
found here. Insert the below JSON into the body text
{
"letterForPosting": {
"SourceClient": "Power Automate",
"Addresses": [
{
"ReceiverName": "John Smith",
"ReceiverAddressLine1": "1 Acme Road",
"ReceiverAddressLine2": "My Street",
"ReceiverAddressTownCityOrLine3": "Town",
"ReceiverAddressCountyStateOrLine4": "County",
"ReceiverAddressPostCode": "Postcode"
}
],
"ReceiverCountryCode": 1,
"Postage": 31,
"Paper": 1,
"Envelope": 1,
"Extras": 0,
"LetterBody": "Dear John, Please find my letter attached",
"IncludeSenderAddressOnEnvelope": true,
"SenderAddress": "22 Acme Acres\n Acme Town",
"YourRef": "MyRef001",
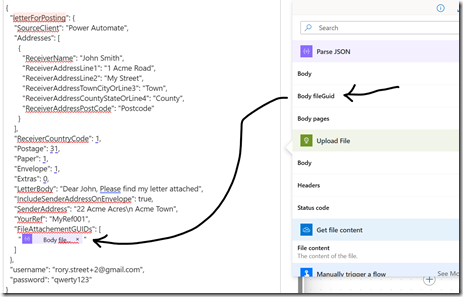
"FileAttachementGUIDs": [
"@{body('Parse_JSON')?['fileGuid']}"
]
},
"username": "username here",
"password": "password here"
}
Important: Ensure you changing the following in the JSON. You can read more about these fields here
username and password: Make sure you update these with your own this can also be your API key and API secret
FileAttachementGUIDs: For this you want to replace @{body('Parse_JSON')?['fileGuid']} with “Body fileGuid” from your Parse JSON action
Note you can find out more about postage options and country codes in the documentation found here. The postage codes can be found using our postal calculator for a quick lookup
Conclusion
That’s it. Please remember to always test your integration signing up for a free test account on https://test.pc2paper.co.uk you can top up your free test account with the following card number 5555558265554449 (this is not a real card number as it is a test environment), use made up details for the rest of the top-up process. You can then see if the letters you send come through to your test account. Remember to change the test endpoints to our live server when you are done by changing https://test to https://www .